SQL Commands - DDL, DQL, DML, DCL, TCL Explained


SQL commands are easy to understand until you reach some websites and see the same complex diagrams and jargon. Now you have reached a point after which you don’t need those! So before we deep dive into things, we map the things.
I will tell you my story of learning SQL Commands, and by the time you reach the end, you will be familiar with the command types and their uses. Along with my story, we will visually compare every command with Excel and help you draw similarities with Excel functions. As soon as you finish reading it, you will never be able to forget about all commands, I promise! 🙂
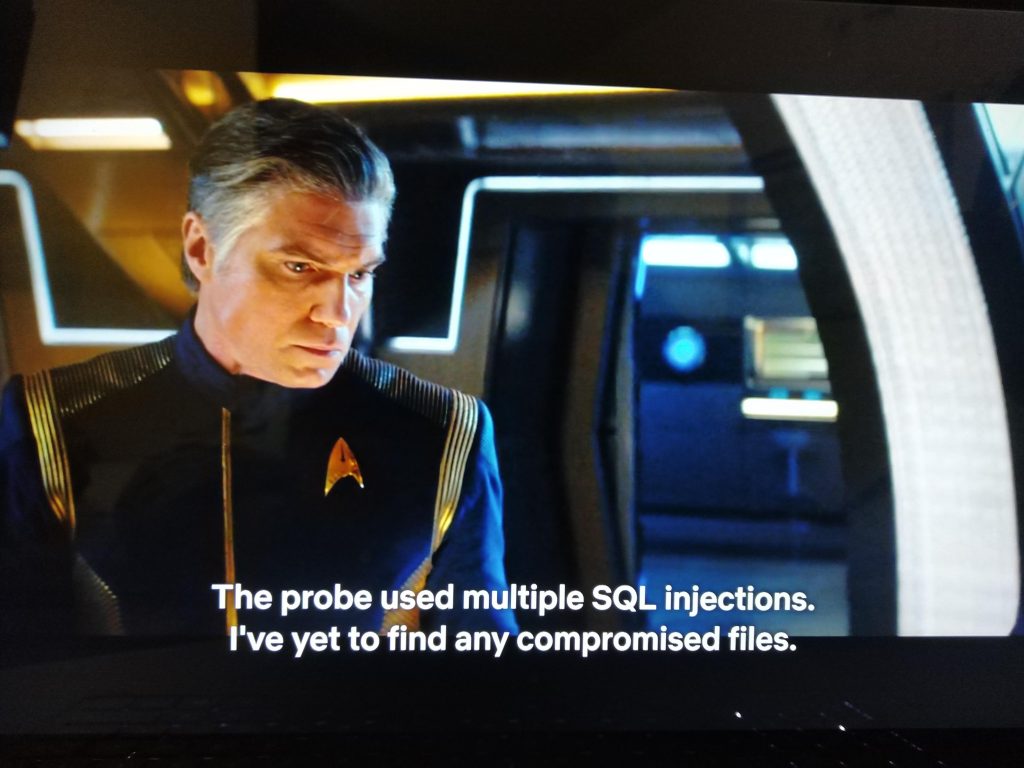
If you are a Star Trek fan, you would know that there was a SQL Injection attack in Star Trek: Discovery, which means it will still be cool in the 23rd century. 🙂
Introduction to SQL commands:
Here are the most specific words to define SQL and SQL commands- SQL is a language to operate(create & manipulate) databases, and commands are instructions to do it.
You all must have used MS Excel at some point in time, and we will relate that experience with SQL in the easiest way possible. :))
In this article, you will learn about SQL commands in the most exciting way. We assume that you must have used MS Excel, and we will connect your past Excel experience to SQL with the most compelling visuals and an excellent personal story.
I learned SQL most excitingly, and I will tell you the story in this article! It is funny, I bet.
I have named it ‘My SQL story,’ not MySQL story. Pardon the pun! 😄
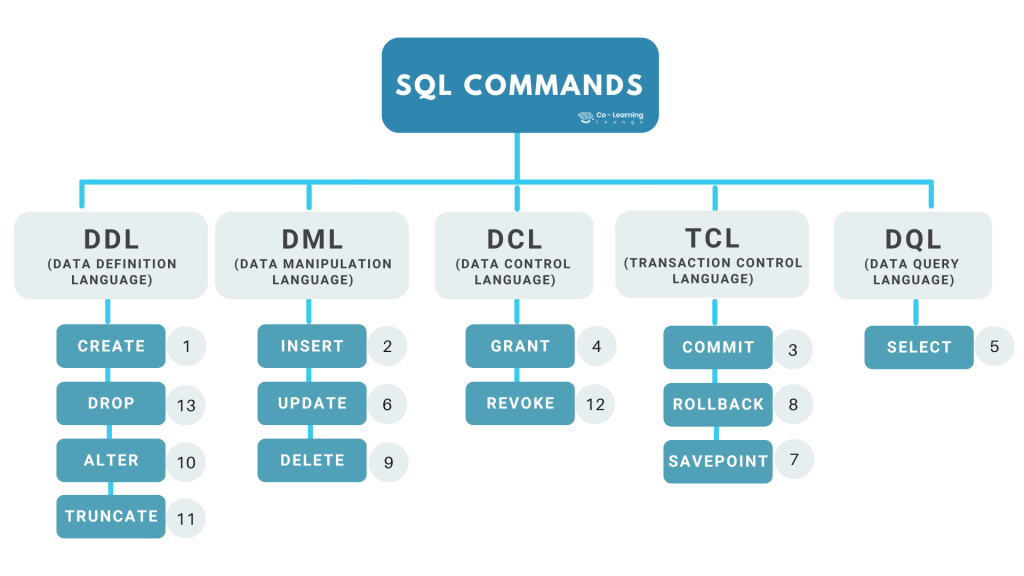
We will deep dive into the exact chronology mentioned in the following diagram. Have a look at the diagram chronologically-
Disclaimer: You are not going to find boring stuff beyond this point. :-))
I hope you have looked closely at the diagram and understand that there are five categories of SQL Commands and some subsets of these categories with marked numbers.
Let’s start my SQL story! :))
I worked in a school in Haryana and was managing massive data of students in Excel files. The principal thought it was efficient to have it on an SQL server instead of Excel for some reason, and they wanted to get it done for one particular class and check if it worked fine.
I opted to do it for class 10th. Why? Because there are only three students. :))
CREATE
CREATE is used to create new databases and tables. You can consider the Database as a folder where you will store all tables.
In simple words, as you can see in the pictures below, we create a new folder where we are going to store/organize all Excel files (Class X, Class IX, Class VIII…), the same way we create a database(School) which we will use to store all tables (Class X, Class IX…) in SQL.
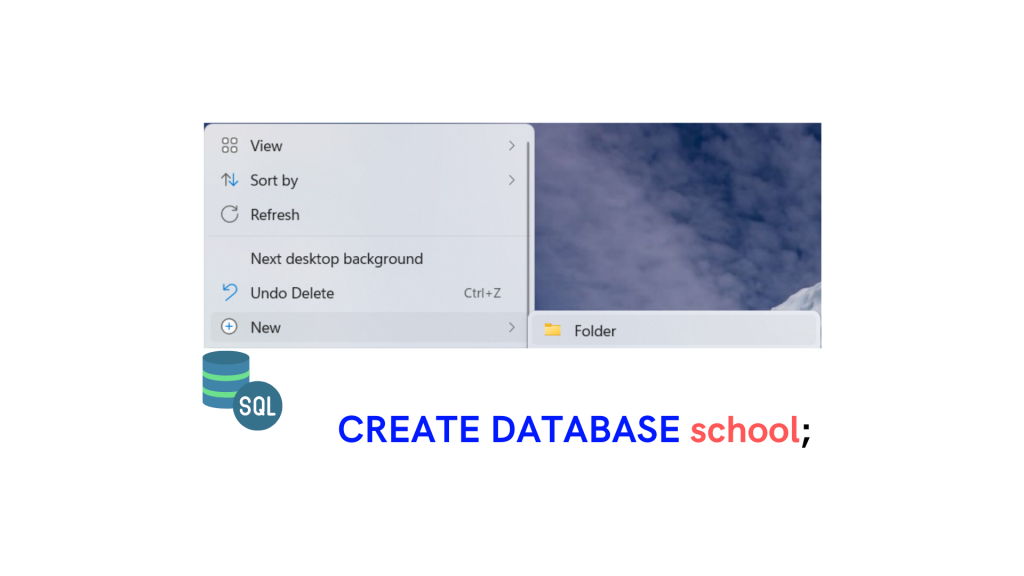
And as we punch ‘New’ for a new Excel sheet, CREATE is used for creating tables like this:
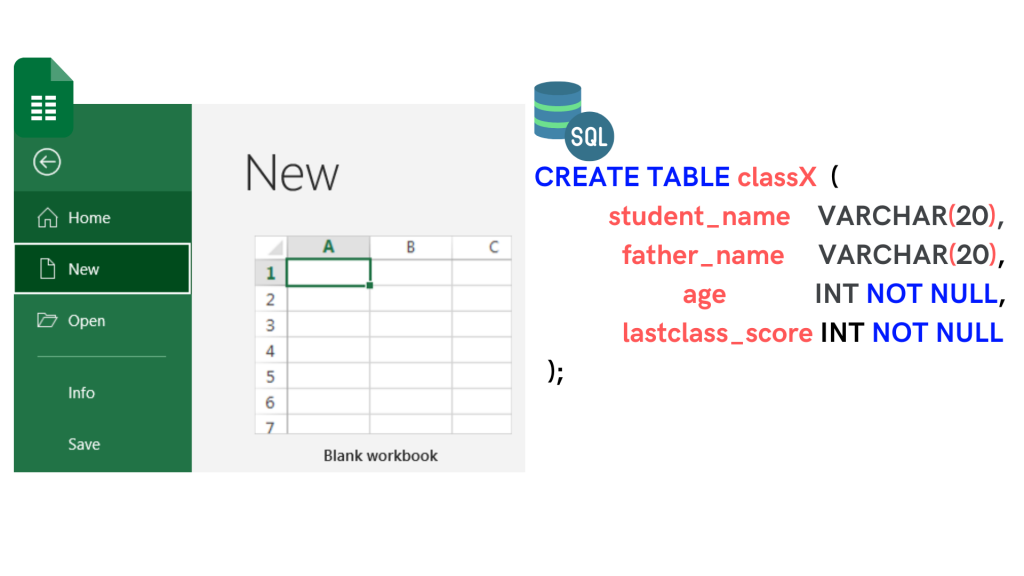
CREATE DATABASE SCHOOL ; CREATE TABLE classX ( student_name varchar(20), father_name varchar(20), Age int NOT NULL, lastclass_score int NOT NULL ) ;
INSERT
Ignore Shakespeare. As the name suggests, INSERT is used to insert data in the tables like we copy/paste or enter in Excel.
For SQL data inserting is like this:
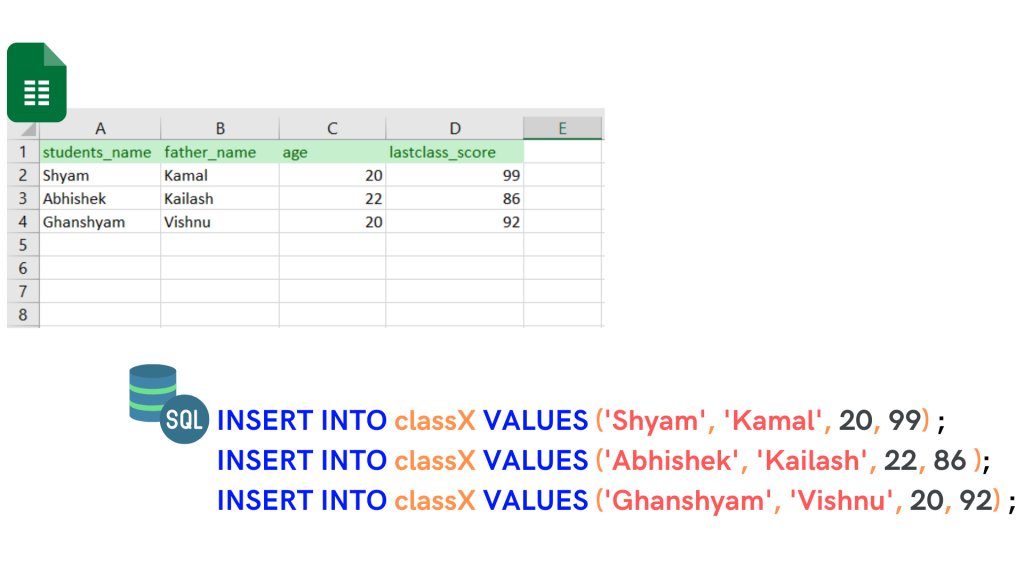
INSERT INTO classX VALUES ('Shyam', 'Kamal', 20, 99) ; INSERT INTO classX VALUES ('Abhishek', 'Kailash', 22, 86 ); INSERT INTO classX VALUES ('Ghanshyam', 'Vishnu', 20, 92) ;
Now, as you see, we have entered the data of all three students in both SQL table and Excel. :)) We haven’t saved/COMMIT the data because MySQL Workbench has an autocommit feature. If it is disabled, you have to save/commit after inserting data.
COMMIT
COMMIT is saving the data. Simple, right? After adding all three records, you press CTRL+S in Excel and COMMIT in SQL.
Here is how you save with COMMIT after adding data/records:

INSERT INTO classX VALUES ('Shyam', 'Kamal', 20, 99) ; INSERT INTO classX VALUES ('Abhishek', 'Kailash', 22, 86 ); INSERT INTO classX VALUES ('Ghanshyam', 'Vishnu', 20, 92) ; COMMIT ;
GRANT
GRANT is used to give access to other users to collaborate. It is like the share option in Excel.
When I was about to COMMIT the data of class X students, the principal arrived and asked me to share access so he could also look and check on it.
This is how it is done:
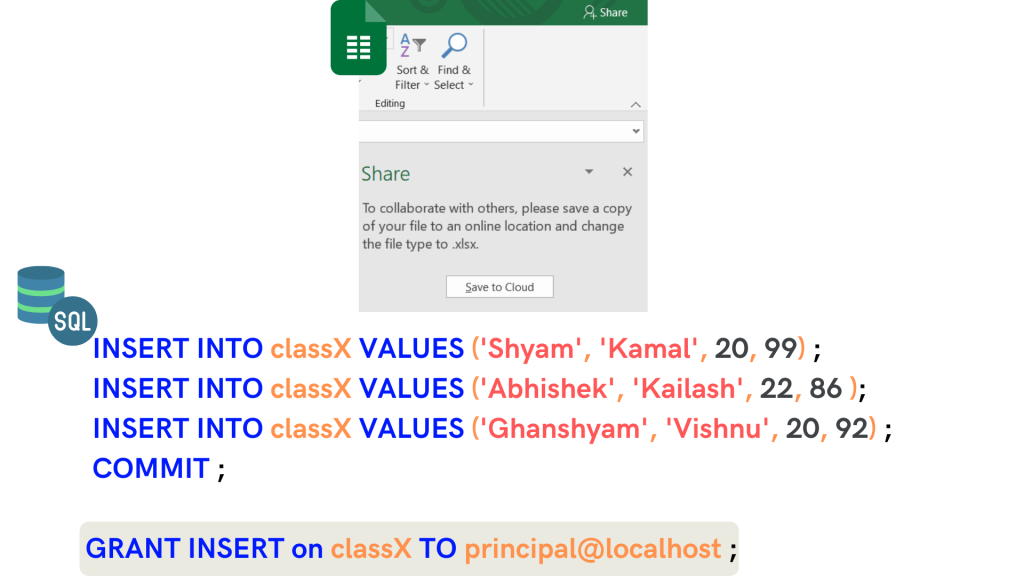
Grant INSERT means; I am granting INSERT access only. 🙂 There are many types of access/privileges that can be provided.
In this case, the other user (principle) should be able to INSERT data into this Table.
INSERT INTO classX VALUES ('Shyam', 'Kamal', 20, 99) ; INSERT INTO classX VALUES ('Abhishek', 'Kailash', 22, 86 ); INSERT INTO classX VALUES ('Ghanshyam', 'Vishnu', 20, 92) ; COMMIT ; GRANT INSERT on classX TO principal@localhost ;
SELECT
SELECT is used to Fetch the data from your tables.
So when I gave Mr. Principal the access, the guy tried everything in & out but couldn’t access class X data. So he came to me and asked more humbly than ever if I could help him. :))
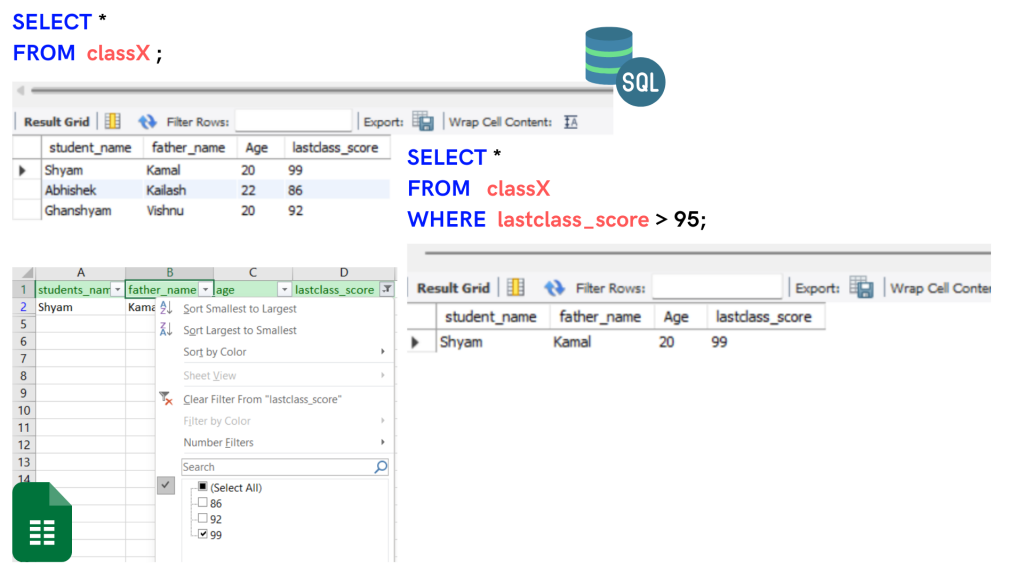
I used SELECT and retrieved the Table. And you can guess what would have happened next. :))
Humiliated because of the simplicity of SQL, his excellency asked if I could show him students who have scored over 95%.
This is the same as putting filters in Excel, as shown in the image above.
SELECT * FROM classX WHERE lastclass_score > 95;
UPDATE
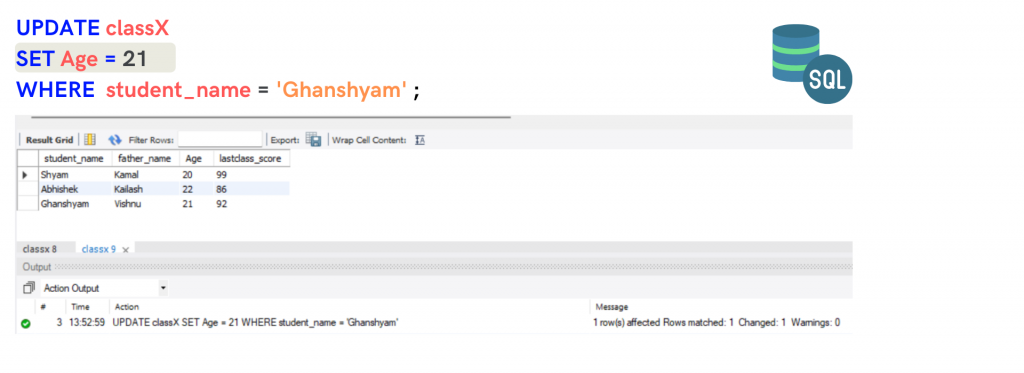
UPDATE replaces some data in the Table.
Here is an interesting catch in the story you won’t believe; I was sitting on a chair pondering deep philosophical thoughts about where this squeaking sound was coming from exactly.
Ghanshyam came with a box of chocolate in his hands and mentioned that it was his birthday. He had turned 21 just the day after we started with SQL. So I had to update it in the Table.
UPDATE classX SET Age = 21 WHERE student_name = 'Ghanshyam' ;
(I hope you are trying to write the same queries on MySQL. If yes, using UPDATE might ask you to disable the safe mode. It can be done with two simple steps:
- Edit > Preferences > SQL Editor > Uncheck safe mode (at the bottom)
- Query > Reconnect to Server
Now try again.)
This is how easy it is to UPDATE the data in tables.
SAVEPOINT
SAVEPOINT is used to undo transactions to a certain point.
Imagine a situation to understand it. Suppose there were 10000 students in class X instead of 3, and we update their lastclass_score. If one record has an error, all our efforts will be unsuccessful as we will have to add all 10000 scores again. The effective way of doing it is you update it for 100 students, put a SAVEPOINT, then again for 100 students. This way, if something goes south, you can Undo/ROLLBACK, and you will only have to update for the current 100 students again.
Let me show you an example, we have only three students at the Table, but mistakenly, I added 3 class IX students to this Table.
INSERT INTO classX VALUES ('Rampal', 'Krishna', 23, 94), ('Kishan', 'Nayan', 19, 81), ('Ashwin', 'Krish', 18, 58)
You can see six students’ records getting inserted into the Table here, and as the last 3 are class IX students, I have to remove those keeping only the first three.
If I undo/ROLLBACK (point 7), I will lose all six records. So the right way to do it would be to keep the SAVEPOINTS so we can undo them until the last SAVEPOINT.
ROLLBACK
ROLLBACK is undone in simple words. So if you remember, we use COMMIT to save the transaction, and ROLLBACK can be used to remove unsaved changes. I had updated Ghanshyam’s age to 21 but hadn’t COMMIT/saved it yet (refer to the previous picture).
How did ROLLBACK help me personally?
I learned that it was Ghanshyam’s birthday, but in the document, it wasn’t! 🙁 (Don’t worry, it is typical in Haryana). According to his birthdate(in school documents), he was still 20. That is why I had to undo it.
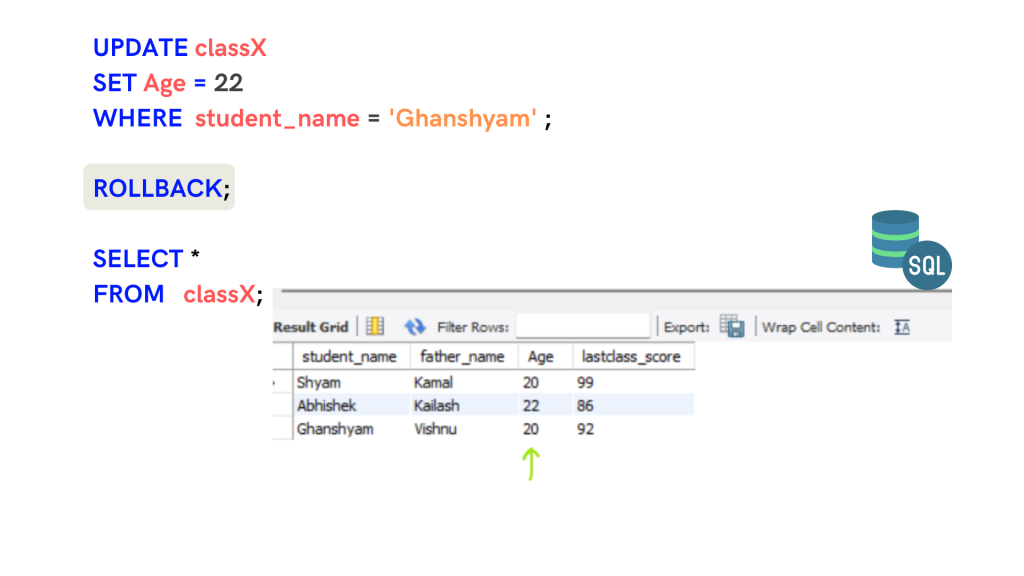
And here he is back in shape again! :-)) And this is why we use ROLLBACK.
UPDATE classX SET Age = 22 WHERE student_name = 'Ghanshyam' ; ROLLBACK; SELECT * FROM classX;
DELETE
As a great teacher once explained this definition, DELETE is used to delete Records. 🙂
Let’s look at this photo of the Excel sheet, and Let me show you how on my class X table;
Here you can see how the record/row was deleted.
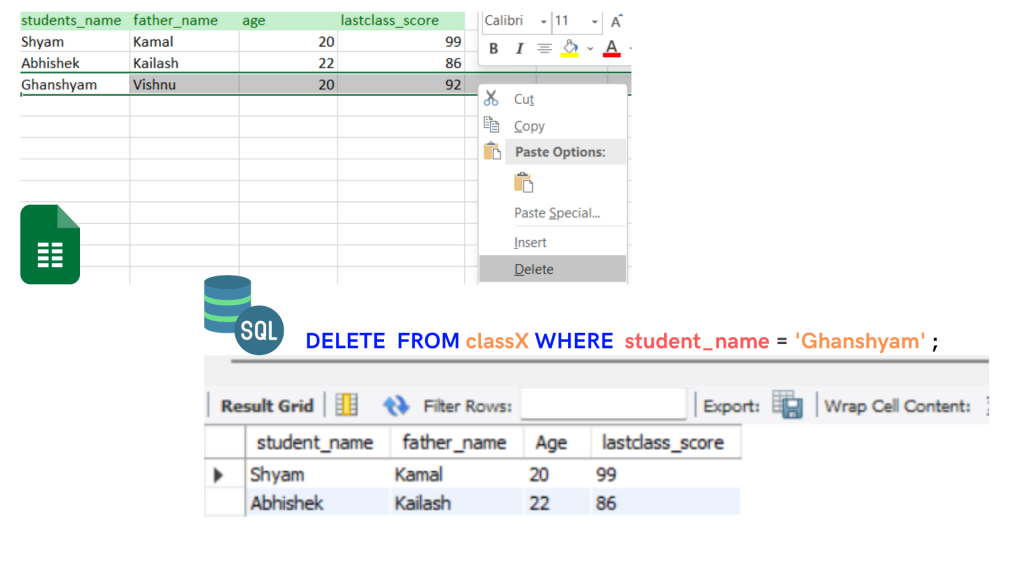
This Delete row option will delete the entire row where Ghanshyam is present. The same way in SQL row is called record; when we use DELETE, it will delete Ghanshyam record.
DELETE FROM classX WHERE student_name = 'Ghanshyam' ;
ALTER
ALTER is used to Alter the Database/table structure, i.e., Columns with their data types and other constraints.
Consider it with the same table we used; in the class X table, there were four fields (columns) (student_name, father_name, age, and lastclass_score). If we have to INSERT data, we can only add records of those fields because the table structure is already fixed.
Let’s do some practical;
An easy example is Shyam’s cousin Balram came for a demo class in School, and we had to add his data because, honestly, the principal and I were pretty sure he would study here. Here is what I did:

What happened here is very easy to understand! I added Balram’s record to the Table, but here is the catch, Balram was in AVM school previously, and the principal sir wanted this School’s name on the Table so we could track how many students from AVM took admission.
I, being a very loyal employee, tried. Here:-
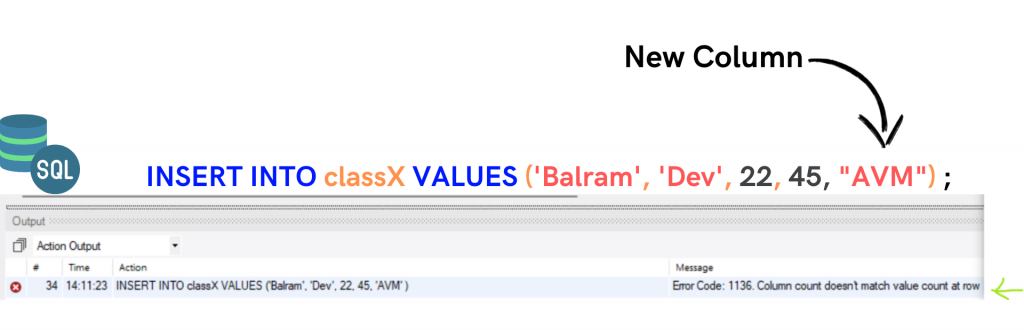
When an additional field is added/deleted/altered, we use ALTER to change the Table’s structure.
Here is how it got done using ALTER –

You can see here that AVM got added now because we ALTERed the Table and made space for AVM to be entered.
ALTER TABLE classX ADD previous_school VARCHAR (20) ; INSERT INTO classX VALUES ('Balram', 'Dev', 22, 45, "AVM") ;
TRUNCATE
TRUNCATE is used to delete all rows.
Let me tell you first why I needed to use TRUNCATE in the first place? And with this, you will learn why TRUNCATE is used.
So with these commands, I gained some confidence in SQL and sought more learning opportunities. Everything was going fine until the School decided to lay off some employees one day. I was the first one to be laid off. I was told they couldn’t spend money on technology. I was furious and decided to DELETE everything and go home.
Do you know if I use DELETE; I have to use it multiple times with different conditions to delete all class X table rows.
I know it is unethical to delete the work when you are asked to leave, but you know what, I wouldn’t miss the opportunity to use TRUNCATE in any case because seldom does one get this opportunity!
Let me show you what I did-
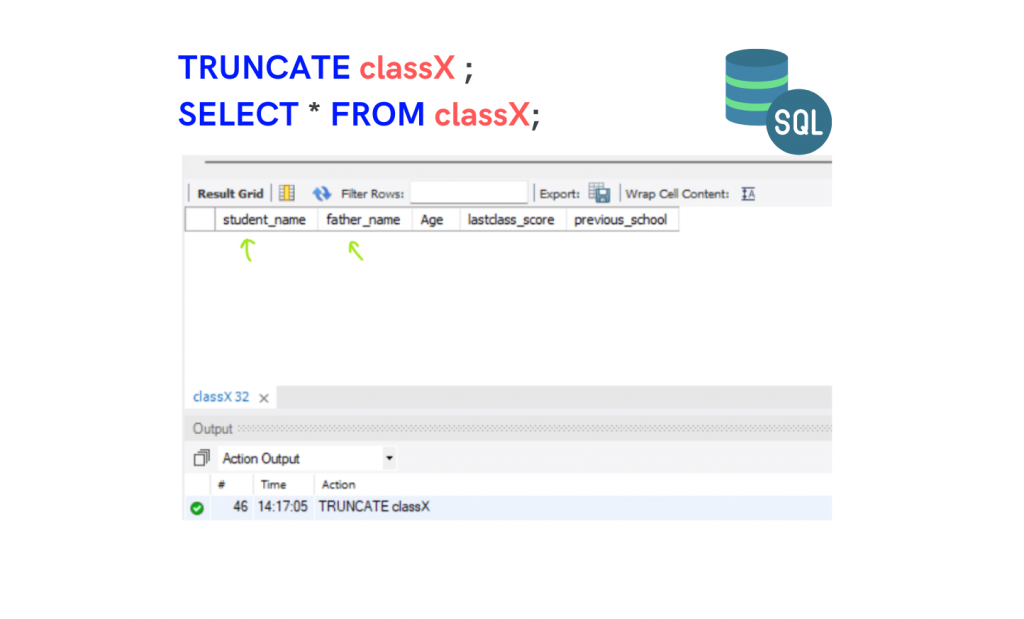
As soon as I used TRUNCATE and saw the results, I discovered the data was deleted, but the table structure is still as it is. You can also see in the results there are all column names still in existence.
And you would think my anger was leveled with this, but it wasn’t. :))
I didn’t want the principal to use INSERT and enter all details again and find the Table as it was. So I had to remove the access to the Table that I GRANT him previously so he couldn’t reuse it.
REVOKE
Like we give some permissions/privileges with GRANT, we revoke their access with REVOKE.
REVOKE INSERT ON classX FROM principle@localhost ;
Like this, I removed permissions so no one can INSERT anything in this Table.
DROP
DROP is used to DELETE tables. Unlike TRUNCATE, it deletes the data with a table structure.
If I were aware of DROP, I wouldn’t need to TRUNCATE and REVOKE the principal’s permissions. I could have used DROP and deleted the Table.
Anyway, I did later because Star Trek told us SQL would be around for centuries, and I wouldn’t leave it for anyone to edit or reuse later.
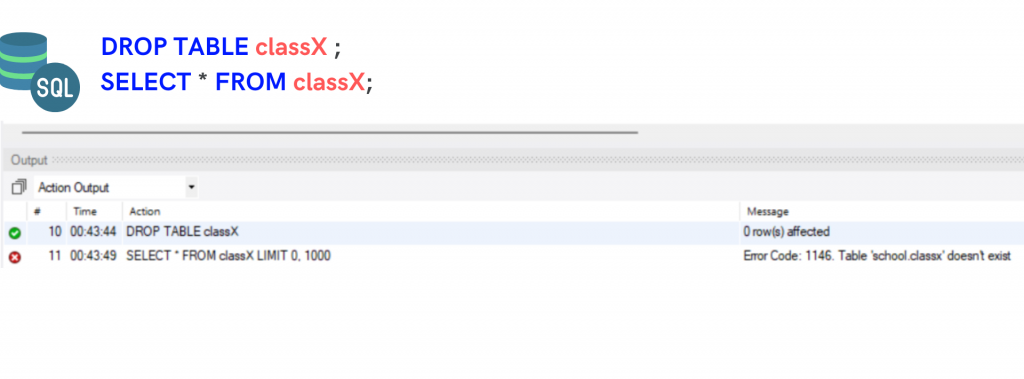
You can see the error’ Table doesn’t exist.
Suppose you have been trying even the same queries on your computer. I can say you have fallen in love with SQL and realized how cool it is!
DROP TABLE classX ; SELECT * FROM classX;
Categories of SQL Commands-
DDL (Data Definition Language)
As the name suggests, this category of commands is used to define data. In simple words, you use DDL to make Database or table level changes like creating, altering, and deleting tables.
CREATE, DROP, ALTER, and TRUNCATE fall under DDL. As you have learned, all commands work on databases and table levels. For example, creating databases and tables, deleting tables, adding columns/fields to the Table, and deleting data (except structure).
These commands are auto-committed, meaning we don’t need to commit after writing CREATE, DROP, ALTER, TRUNCATE, etc.
DML (Data Manipulation Language)
Data Manipulation Language, such commands are used to manipulate data inside a table, not the structure. This means these commands function on the Data level.
INSERT, UPDATE and DELETE fall under DML. In our School database, we have used these commands to add data, update data and delete the records of new students in an already existing table.
This type of command needs to be committed. (if MySQL is not in auto-commit mode).
DCL (Data Control Language)
We use DCL commands to control the access.
E.g., In our Table, we have used GRANT and REVOKE to give access to the principal or take his access back.
These commands are used if we want other people to collaborate on our table/databases.
TCL (Transaction Control Language)
TCL types of commands are used on the data levels. Simply put, it saves and undoes the changes you make with DML commands.
We have used COMMIT, ROLLBACK, and SAVEPOINT in the explanation.
These TCLs are used with DML because you save or undo them only after making data-level changes.
DQL (Data Query Language)
In DQL, users can retrieve data in any order they want.
These types of commands perform operations on tables to get the desired output. SELECT is the most popular command under the DQL category.
E.g., we were using SELECT to retrieve the data to check if all operations were successfully implemented.
You see all the data on the Excel sheet when you open it, but you use DQL commands to fetch it here. So if you have to list out students who scored over 90%, you put a filter in Excel and use a SELECT statement with some conditions to get the same output.
So when I started SQL in School, I didn’t know how it worked, but it was the easiest thing to figure out.
I hope you all have learned some things about how SQL commands work, from creating a table/database to inserting data into it and then retrieving the data with the experience of learning it while working at a school. That’s the beginning of pretty much what you do with SQL.
You can install MySQL workbench with this blog's help and implement the things mentioned above step by step to take your love to the second phase. 😀
My friend is working on a website and told me he wanted to use MySQL.
Why can’t he use HisOwnSQL?
Ok, that was the last pun. Peace out!